

Tutorial: Building An Automation 360 Package
Automation 360 brings with it the ability for developers to create, publish, and share their own custom packages. For those not familiar with the Automation Anywhere platform, a package is a collection of configurable actions that can be used as the building block of bots. Out of the box, Automation 360 includes hundreds of actions contained within 70+ packages. In addition to those packages which ship with the product, the Automation Anywhere Bot Store makes 50+ additional packages available that are all free to download and use within your Automation 360 control room. Essentially these packages form the tools of the proverbial toolbelt that an RPA developer has at their disposal when building bots. But what if I want to integrate with an application that is native to my organization? Or an application that is not represented in the default package set or via Bot Store? Fortunately, the Automation 360 Package SDK provides the framework for developers to create and test their own custom packages. In the tutorial above, we cover many of the key points of getting started in package development. To supplement those details, we're also including some resources and links below to dig deeper into several of the topics mentioned. (Note: if you're just looking for the solution from the project from the video, scroll to the conclusion section on this page)
Pre-Work: Machine Setup
If you haven't done so already, getting your machine set up with the required installations/files is the first thing to take on. We have a video dedicated just to that topic alone because getting this part right is that important to your success in being able to build and compile your package. In short, you'll need the Java Developer Kit (JDK 11), a Java IDE (we're using IntelliJ IDEA), Gradle 5.x (included with IntelliJ), and the Automation Anywhere Package SDK (we'll be using the .19 version of the SDK for the video above, but any version compatible with your Control Room should work)
Package Level Attributes
- Package level attributes allow developers to set values that appear at the package level within the Automation 360 Control Room. (Remember: a package is a container of actions, so when we think package level - we should be thinking of just how that collection itself is named/labeled/described)
- File: settings.gradle Attribute: rootProject.name
- This is the root name for the project. This value appears in the Java IDE as the name of the project, and is also used for the name of the jar file that gets created as a result of building the project.
- File: package.template Attribute: name
- This is the name of the package - and really only shows up on the Packages page of the Control Room. This is not the name that you see in the actions pane of the bot developer interface.
- File: package.template Attribute: label
- This is the label for the package - and controls how the package will be displayed/listed in the package list and in the actions pane of the bot development interface. This is how users will find/see your package, so make sure the value you give here is meaningful. Spaces are permitted.
- File: package.template Attribute: description
- This is the description for your package - which shows up on mouse-over of the package name in the actions pane in the development interface as well as on the packages page.
Annotations
- We won't seek to re-invent the wheel here. The documentation portal does an excellent job of explaining some of the SDK annotations.
- In short, the session above focuses on the following annotations:
- Action Level
- @BotCommand - makes the class eligible as an action
- @CommandPkg - establishes the GUI label elements for the action
- @Execute - serves as the entry point for the action's operations
- Input Field Level
- @Idx - the index position of the field (each must be unique per action)
- @Pkg - UI labels including the field title and description for the input field
- @NotEmpty - Optional annotation for requiring a field value to be set
- Action Level
- As mentioned above, this is not an exhaustive list of all available SDK annotations, for more details on additional annotations, see the Automation Anywhere documentation portal.
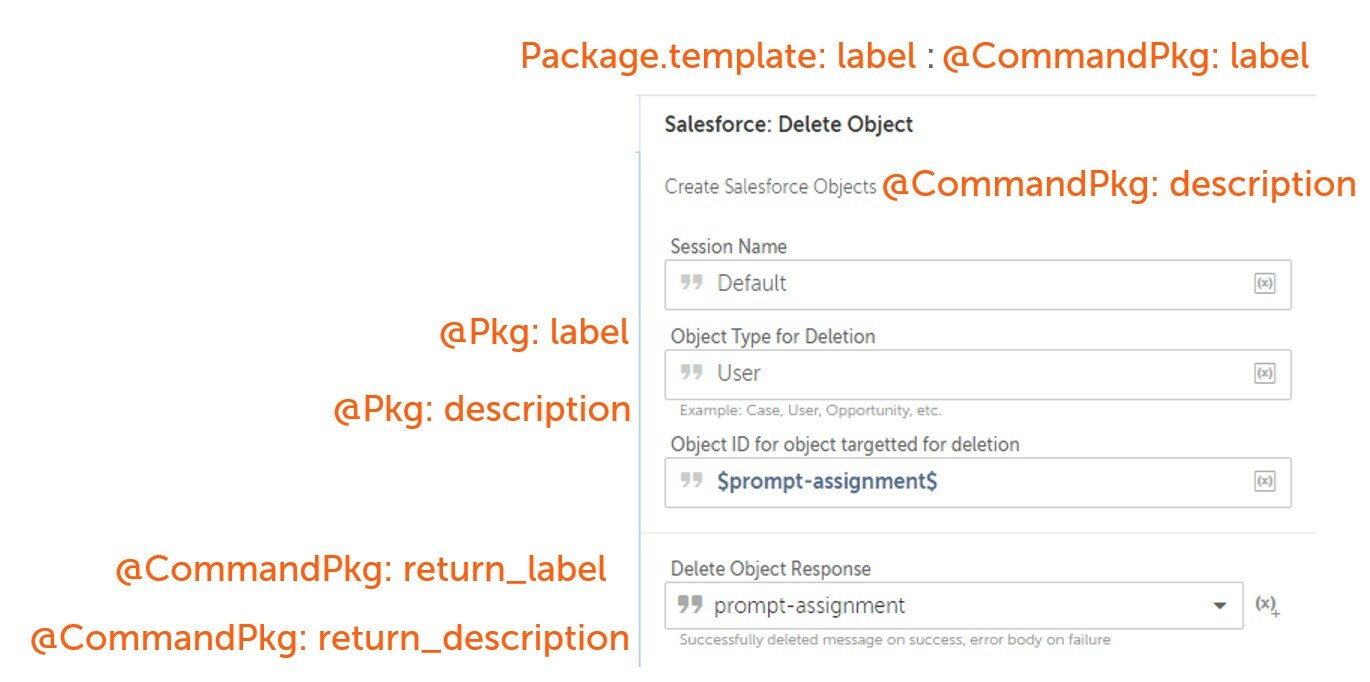
@CommandPkg Labels - Action-level Attributes
- name: Internal name for the action which must be unique within the package
- label: Name of the action as it appears in the package details and bot building screens
- node_label: Sub-label that displays under the action label in the bot development interface
- description: Description of the action that displays in the package interface and on hover of the action in the bot development interface
- return_label: Label used for the return value field
- return_description: Optional description of the returned value - used for giving additional context to the user on what to expect on the return
- icon: name of the svg used as the icon in displaying the action on the bot building screens

-
- Note: reference the "pkg.svg" as the icon, but include an "iconwhite.svg" in the same directory should you wish to replicate the look of the out-of-box packages.
-
@Pkg - Field-level Attributes
-
- label: Label of the field which appears above the input in the action configuration pane
- description: Text that appears below the field giving the user further context on the format/expected use of this field.
- Note: the screenshot below shows the field-level attributes, as well as several other attributes mentioned in previous sections of this tutorial.
Package Development Checklist
- Validate the build.gradle of your project - ensuring that repositories that are not ultimately needed are referenced in the dependencies section.
- Be sure that the project name is set in the settings.gradle file - as this will determine part of the name of the package upon build.
- Validate that all intended names/labels are set properly in the package.template file
- Validate that the local JSON has all of the action and field level labels and descriptions
- Ensure that a test class has been set up with a test case that has been executed in the IDE (or can alternatively can be executed on build)
- Finally - build the jar file with the clean build shadowJar in the IntelliJ IDE or by navigating to the project root directory in a command prompt and entering
gradlew.bat clean build shadowJar
Conclusion
The Automation Anywhere Package SDK enables developers to extend the capabilities of the Automation 360 RPA platform - and empower bot builders to leverage reusable, custom-built solutions. The code from the video above can be found on the Automation Anywhere GitHub repo. If you enjoyed this session and want to see more content like this, let us know by contacting us on Linkedin or by getting in touch on Twitter. Best of luck with your package-building endeavors and go be great!
