

In part I, we set up our Salesforce Dev environment and installed the Automation 360 connector - now, it's time to configure the connector and test! This is part 2 of our 3 part Salesforce connector tutorial series. If you didn't get a chance to check out part 1 yet, be sure to check it out so you can learn how to set up your Salesforce Dev environment (free) and install the Automation 360 connector.
Setting Up and Using the Salesforce Connector Part II
The Automation Anywhere RPA Bots for Salesforce app that's available on Salesforce's AppExchange enables organizations to tightly integrate their Salesforce environment with the Automation 360 platform. This integration enables Salesforce users to trigger bots directly from the Salesforce interface (or via flows) that can run on attended or unattended Automation 360 bot runners. The Salesforce users triggering bots don't have to have Automation Anywhere Control Room accounts, nor do they need to know anything about configuring a bot runner. Best of all, object attributes from Salesforce can be mapped to input variables of the executing bot, and variables marked as output values can be mapped back to Salesforce to automatically update/create/delete Salesforce objects.
This tutorial is part 2 of our 3-part Salesforce Connector tutorial series. This part of the series will focus exclusively on configuring the Salesforce app to connect to an Automation 360 Control Room, setting up a configuration for a demo bot, and doing a quick dry run to test that the Salesforce environment is able to communicate back and forth with the Automation 360 Control Room.
Create a User & Role in the Automation 360 Control Room
The Automation 360 Control Room uses RBAC (role-based access controls) - which means roles can be created that grant one or more permissions related to Control Room functionality - and those roles can be granted to one or more user accounts. It's a good practice when using RBAC to create roles that contain ONLY the minimum permissions needed to accomplish the goal of the role - in an effort to minimize permissions that may be incidentally granted to users who don't actually need said permissions. In step with that recommendation, we'll be following the documentation for this one which walks through the process of creating a user and role for establishing a connection between the Automation 360 Control Room and the Salesforce environment. The same is covered in the video above if you prefer to watch this done, but the documentation is quite good here as well.
Create Control Room User for RPA Bots for Salesforce Connector
Create a Custom Roles for RPA Bots for Salesforce Connector
Note on the User Account: Later in this tutorial, we'll establish a connection between the Salesforce environment and your Control Room. As a part of that process, you will be prompted to provide the username and password (or optionally API key) for this account - so make sure you hang on to the account details.
Add Certificate Details & Consumer Key
In part I of our tutorial series, we left off at the point of initiating the install of the Salesforce connector from AppExchange. With that connector/app successfully installed, we now need to start setting it up. If you click the launcher icon (3x3 colored circles in the top left corner of the Salesforce lightning setup screen), you can search for any Salesforce objects/apps - type in RPA and you should see the recently installed RPA Bots for Salesforce app with the Automation Anywhere logo. Right-click this app and select to Open in New Tab as we'll need to go back and forth between the setup of this app and the Salesforce lightning setup screen as we begin to establish the connection between the Salesforce environment and our Control Room.
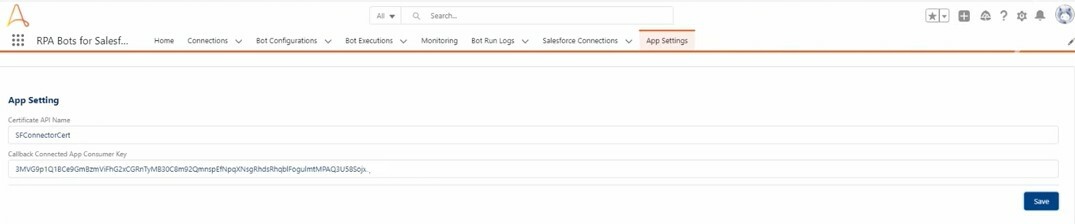
The first thing we need to do is configure the app itself. On the Salesforce Connector App page, click the App Settings tab along the top of the screen to begin setting things up. The App Settings page will prompt you for some details we established from the setup we did in part I of this tutorial series - the Certificate API Name and the Connected App Consumer Key.
In the Certificate API Name field, provide the name of the certificate that was generated from part I of the tutorial - without the .srt extension. For example, in part I, Micah named his certificate SFConnectorCert and downloaded the SFConnectorCert.srt file. Using that as an example, he would need to enter SFConnectorCert into the Certificate API name field.
In the Callback Connected App Consumer Key field, provide the Consumer Key that was generated during the creation of the connected app from part I of this tutorial series. You can find this Consumer Key by going back to the Salesforce Lightning Setup page and navigating to Apps > App Manager. Once you've located the connected app created for this Salesforce extension, click the context menu on the far right side of the connected app row (the down arrow button) to select View. From this screen, you'll be able to find and copy the consumer key for your connected app, which can be used to fill in the details for the Callback Connected App Consumer Key field.
Taking a quick step back - why do we have to do these two things? What we're doing here is establishing some values that the RPA Bots for Salesforce app can use as it securely brokers the connection between the Salesforce and Automation 360 environments. Even if you dont expect your bots to be used for updating Salesforce object properties, this connection is still required for the Control Room to be able to call back to the Salesforce environment, letting users know that the bot has executed successfully/finished.
Whitelist Control Room Connection
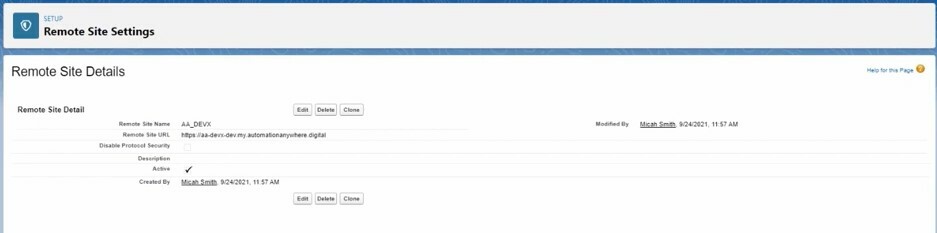
In order for our Control Room to be able to communicate back and forth with our Salesforce environment, we'll need to whitelist the Control Room URL. From the Salesforce Lightning setup page, navigate to Settings > Security > Remote Site Settings. From the All Remote Sites page, click the New Remote Site button right above the existing remote sites table. In the Remote Site Edit page that follows, provide the remote site with a name (ProdControlRoom or something that helps you know what environment this is) along with the URL of your Control Room in the Remote Site URL field.
Repeat this process to create a Remote Site Settings profile for Salesforce as well. Assuming you're using Salesforce cloud, the URL should be https://login.salesforce.com, and the Remote Site Name can be whatever you'd like. This will be important for the connection to work both to and from Salesforce to our Control Room.
Create an In-App Connection to the Control Room
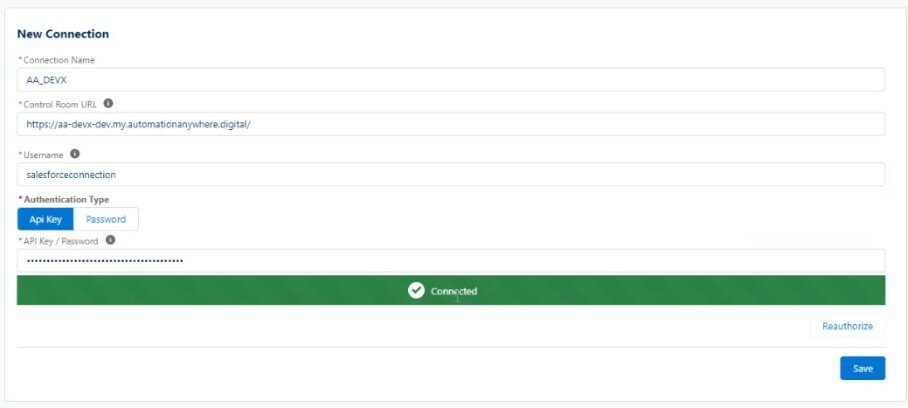
A Connection in the RPA Bots for Salesforce connector is where we provide the specific connection credentials for the Salesforce app to talk to our Control Room. Switch back to the RPA Bots for Salesforce app tab in your browser, click on the Connections tab to start creating and configuring a new connection. In the top right corner of the RPA Bots for Salesforce Connections page, click the New button to start the process of creating a new connection. Through this connection, we'll establish the true connection - URL, username, password/API Key - so that our Salesforce environment can connect with our Automation 360 environment. To start the connection, provide a Connection Name, Control Room URL, Username, and Password/API Key. The Connection Name does not have to match the same name used in the Whitelist step earlier, but the URL used should be the same.
Note: You can use either a password or API key to establish this connection to your Control Room. Micah's view is that an API key is best - so that should your password ever be reset/expire, you wouldn't lose the connection established between your Control Room and Salesforce environment - and so that should someone else be doing this part of the setup for you (a Salesforce admin) - you don't have to give out any passwords. On the flip side, you would lose any established connections if you ever generated a new API key for that same user account, so be aware of that before re-generating a new API key. If you're not familiar with the process of generating an API key for your account, Micah shows this exact process at the 13:50 mark in the video above.
Once the above details are provided - press the Connect button to test the connection. Should everything work smoothly, you'll be greeted by a message indicating that your Salesforce environment is now connected to your Control Room. If this connection was not successful, be sure that you've appropriately whitelisted your Control Room and are using the appropriate user details/role.
Create a Bot & Bot Configuration
In order to set up the Bot Configuration in the RPA for Salesforce connector, we'll need to have at least one bot to test with. In the video above, Micah creates a dummy bot (at the 16:00 mark) that is designed to take a couple of values as input - so that we can see data being mapped from Salesforce to our Automation Anywhere bot. The example bot takes in an sID and sDescription - both marked as input variables. We won't go over the process of building out this bot in the written tutorial here, but watch the video above if you want to see how Micah does it (spoiler alert: it's just a bot that takes in two input variables and displays them in a Message Box). One final note on the bot creation side of things: in order for you to be able to see your newly created bot from the RPA for Salesforce Bot Configuration, your bot will need to be checked into your Control Room's public repository. Private bots can not be configured with the RPA Bots for Salesforce connector.
Back on the RPA for Salesforce connector screen, click the Bot Configurations tab to begin setting up a new bot configuration. Click the New button to begin setting up a new bot configuration. Each bot configuration within the RPA Bots for Salesforce app establishes a relationship with a single bot found on your Automation 360 Control Room. Begin this setup by providing your bot configuration with a unique Name and selecting the Connection you wish to use for this connection (spoiler alert: if you're following this tutorial we only have one connection, so not much to choose from there).
Once both of those values are set, you'll see a quick loading page appear - where the RPA Bots for Salesforce app is actually connecting to the Automation 360 Control Room and pulling back all of the bot/folder names from your Control Room's public repository. Select the demo bot that you'd just created (or a real bot if you're setting this up for actual use) by navigating to the bot in the Control Room hierarchy presented in the app.
With a bot selected, we'll also need to fill out the run detail options. Bots can run on server (unattended bot runner) or run locally (attended bot runner). Additionally, we'll need to select the run as user (under which context should this bot run) and the device pool (optional - if you're using device pools, this enables any triggered instance of the bot to be sent to a pool of runners as opposed to just a single device assigned to the selected run as user). Finally, select how the bot can be deployed - either by user and/or by flow. By user means that an RPA for Salesforce widget can be added to the Salesforce interface and users can initiate bot runs from there. Running by flow means that bot executions can be kicked off from flows built by Salesforce's flow builder capability. One or both of these options can be selected. Press the Next button to continue. 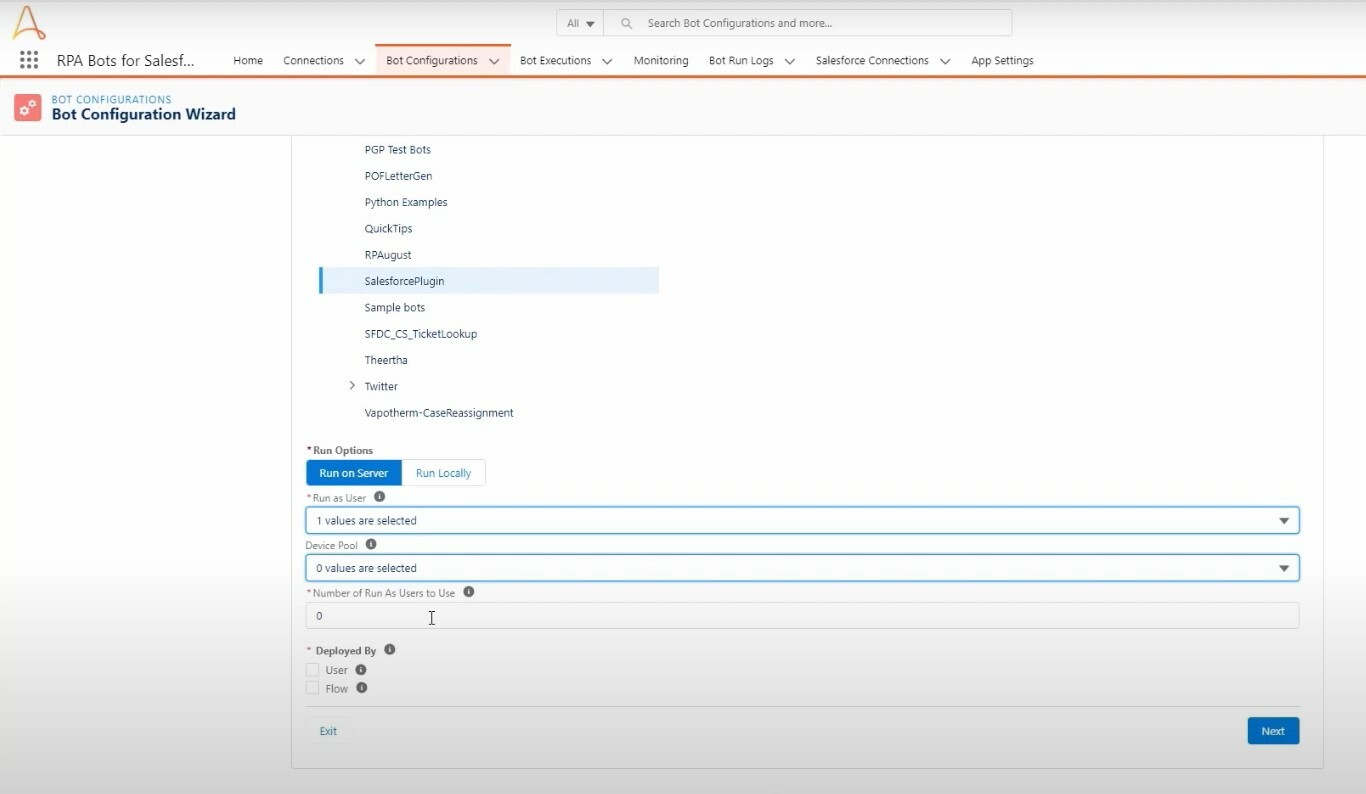
From the Object Selection and Field mapping screen (part 2 of 3 in our Bot Configuration setup) - we'll be able to determine which Salesforce object/values will be sent to the bot for its execution. Note that this will only work because we enabled 2 input fields on the bot we'd selected in part 1 of our Bot Configuration setup...if no input variables were available on the selected bot, there wouldn't be anything for us to map values to on the Automation 360 side. In following along with the video tutorial above, select Case for the Object type, and click the Add a mapping button to add the following mappings between the Automation Anywhere fields and Salesforce Fields.
- Mapping 1:
- Automation Anywhere Field: sID
- Mapping Type: SF Field
- Salesforce Field: Case ID
- Mapping 2:
- Automation Anywhere Field: sDescription
- Mapping Type: SF Field
- Salesforce Field: Subject
Note: For the Mapping Type field, we used SF Field to indicate that this value would be mapping a property from the selected Salesforce object to our bot. If we wanted to have an input field for our user to fill in instead of a direct SF field mapping, we could have selected Input for the mapping type instead and the user would be presented with an input field as a part of the Bot Launcher UI.
Our final step in setting up our Bot Configuration for this tutorial is to enable the mapping of fields back from our Automation Anywhere bot to our Salesforce environment. For the purposes of this demo, we didn't set up any output variables on the demo bot we'd created, so we'll skip this setup for now, but in part III of our Salesforce Connector tutorial series, we'll be doing a full bot build which includes mapping values from Salesforce to Automation Anywhere and back.
The last part of our setup here is to add the RPA Bots for Salesforce connector to the Salesforce object interface. Since we'd set up our demo on the Case object and selected Deployed by User in our Bot Configuration, select a case in Salesforce, press the gear icon in the top right corner of the Salesforce screen, and select Edit Page. In the Components pane on the left side of the screen, scroll to the very bottom where you should see a section of Custom-Managed components. Click the AAIRPA Bot Launcher component and drag it onto the Salesforce App Builder interface - dropping it in a location that you think makes the most sense for your users to consume it. Press the Save button in the top right corner of your App Builder screen to save the new layout for Cases.
Testing
We're finally ready to test. Using the Cases object, since that's what we used in the written tutorial and video above, select a Case and ensure that the Automation Launcher pane appears in your user interface (you may have to refresh). The Bot Configuration we'd just set up should be showing with the name provided in the configuration setup. Press the Run button to initiate the bot execution. At this point, Salesforce will send a request to the Automation 360 Control Room to execute the bot we'd selected in the Bot Configuration setup, along with the values that we'd mapped to Automation 360 input values.
Assuming the bot launched successfully, you should see a toast message at the top of your Salesforce screen that says that the Bot has been launched successfully. Upon successful completion of the bot run, you should also see a notification in the top right of the Salesforce interface letting you know that the bot run was completed successfully.
Conclusion
The Automation Anywhere Salesforce App enables organizations to quickly scale the consumption and use of RPA bots within the organization through seamless integration with Salesforce. This tutorial focused on the setup and configuration of the RPA Bots for Salesforce connector - and while it was a lot of work, fortunately, most of it was one-time setup kind of stuff. All subsequent bot configurations would only mean selecting a bot, determining runtime details, and mapping values to/from the bot. In our third and final tutorial in this series, we'll create a real Automation 360 bot, check it into the public repo of our Control Room, and do value mappings both to Automation 360 and back to Salesforce so we can see the bot update a Salesforce Object directly in the Salesforce user interface!